Poco-Cocoa

Things & Stuff

  • Runny yolks

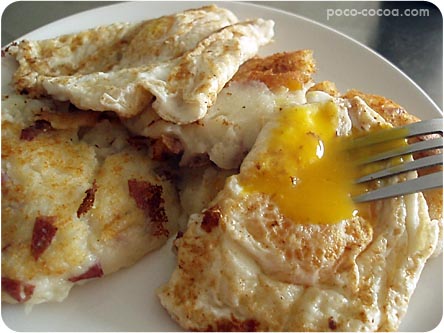
    I know that every time I eat them, I’m risking Salmonella poisoning. But runny yolks are just so good! They’re all smooth and oozy, and they make everything around them just that much better.

    1. Runny yolk, how do I love thee? Let me count the ways…
    2. Fried eggs in the morning, sprinkled with salt and scooped up with tortillas
    3. Fried eggs on stacked red enchiladas, in a small cafe somewhere in New Mexico
    4. Fried eggs on mashed potato pancakes (see photo above, and also here)
    5. Fried egg sandwiches at Parkside
    6. Soft boiled eggs, eaten from a cute egg cup, with a tiny spoon 

    And any other way you can imagine. I do have one rule, though…the whites have to be fully cooked. Runny whites? Not a good thing.

    But runny yolks…I’ll risk Salmonella any day. 🙂

    December 11, 2008
    Edibles
  • More Brussels Sprouts

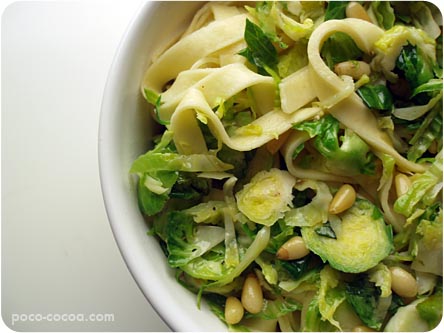
    So in case you need another reason to buy some Brussels sprouts this winter, here’s an easy, delicious way to cook them. You just slice them up, toss them with butter and pine nuts, and serve with pasta. Seriously, it’s that easy.

    And that’s about all I have to say today. Happy Tuesday!

    Fettuccine with Brussels Sprouts and Pine Nuts

    • 12 ounces Brussels sprouts, trimmed
    • 8 ounces dried (or fresh refrigerated) fettuccine
    • 2 tablespoons unsalted butter
    • 2 tablespoons olive oil
    • 3 tablespoons pine nuts
    • grated Parmigiano-Reggiano

    Slice Brussels sprouts in a food processor fitted with slicing disk.

    Cook fettuccine in a pasta pot of boiling salted water until al dente.

    Meanwhile, heat butter and oil in a large heavy skillet over medium heat until foam subsides, then cook pine nuts, stirring, until golden, 1 to 2 minutes. Add Brussels sprouts, 1/2 teaspoon salt, and 1/4 teaspoon pepper, then saute over medium-high heat until tender and lightly browned, about 4 minutes.

    Reserve 1/2 cup pasta-cooking water, then drain pasta and add to skillet, tossing with enough reserved water to moisten.

    Makes 4 servings.

    Source: Gourmet magazine.

    December 9, 2008
    Recipes
  • Pumpkin Whoopie Pies

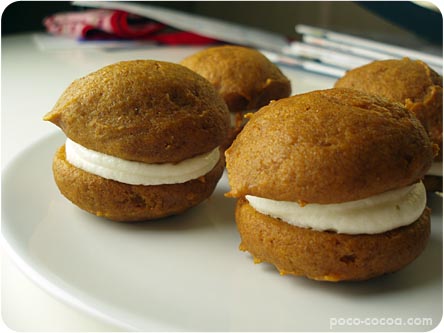
    Okay, people. This is the recipe you’ve all been waiting for: Pumpkin Whoopie Pies.

    I’ve been coveting Baked: New Frontiers in Baking for a while now, and today I FINALLY drove myself to the bookstore and bought it. I’m so excited! Every recipe in the book looks fabulous, and if they’re even half as delicious as these whoopie pies are (I originally saw this recipe on Martha Stewart’s website), I’ll be ecstatic. Perhaps I should warn my co-workers about the potential onslaught of home-baked goodies I’ll be bringing to work. 🙂 I mean seriously…Root Beer Bundt Cake? Butterscotch Pudding Tarts? Hazelnut Cinnamon Chip Biscotti? Please. I plan to bake every recipe in this book. (Never mind that Justin and I are trying to eat healthier…this is why I’ll be showering my co-workers with this stuff in the near future.)

    So these little treats are fun to make. They take some time since you have to bake them in several batches, then assemble them, but they’re soooooo worth it. The cake is perfectly moist and pumpkiny, and the cream cheese filling is decadent and smooth.

    I did make some adjustments (surprise)…I used cinnamon and a bit of pumpkin pie spice instead of the cinnamon/ginger/cloves mix called for in the recipe. I always use extra cinnamon because I LOVE my cinnamon…I swear, it’s the best thing on the planet. Also, the book states that the recipe yields 12 whoopie pies…no way. Using the exact-sized scoop they called for, I ended up with about 32. So if you’re not planning on sharing with quite a few people, you might want to cut the recipe in half. (For your own sake…trust me, you’d eat the whole batch if you could.)

    Pumpkin Whoopie Pies

    For the Pumpkin Whoopie Cookies

    • 3 cups all-purpose flour
    • 1 teaspoon salt
    • 1 teasopon baking powder
    • 1 teaspoon baking soda
    • 1 tablespoon cinnamon
    • 2 tablespoons pumpkin pie spice
    • 2 cups firmly packed brown sugar
    • 1 cup canola oil
    • 3 cups chilled pumpkin puree
    • 2 large eggs
    • 1 teaspoon pure vanilla extract

    For the Cream Cheese Filling:

    • 3 cups confectioners’ sugar
    • 1/2 cup (1 stick) unsalted butter, softened
    • 8 ounces cream cheese, softened
    • 1 teaspoon pure vanilla extract

    Make the Pumpkin Whoopie Cookies:

    Preheat oven to 350 degrees F. Line two baking sheets with parchment paper or Silpats.

    In a large bowl, whisk the flour, salt, baking powder, baking soda, cinnamon and pumpkin pie spice together and set aside.

    In a separate bowl, beat the brown sugar and oil together with an electric mixer until combined. Add the pumpkin puree and beat to combine thoroughly. Add the eggs and vanilla and beat until combined.

    Sprinkle the flour mixture over the pumpkin mixture and beat until completely combined.

    Use a small scoop with a release mechanism (this is important, so that the shape of the cookies turns out right) to drop heaping tablespoons of the dough onto the prepared baking sheets, about 1 inch apart. Bake for 12 to 14 minutes, until the cookies are just starting to crack on top and a toothpick inserted into the center of a cookie comes out clean. Let cookies cool for about 5 minutes, then transfer to a cooling rack. Continue baking batches, keeping cookie dough in the refrigerator while each batch bakes.

    Make the Cream Cheese Filling:

    Sift the confectioners’ sugar into a large bowl. Add butter, cream cheese and vanilla, and beat until smooth. Be careful not to overbeat the filling. (The filling can be made 1 day head. Cover the bowl tightly and keep in the refrigerator. Let filling soften to room temperature before using.)

    Assemble the Whoopie Pies:

    Turn half of the cooled cookies upside down.

    Spoon filling into a ziploc bag (or use a piping bag with a large tip), press out the air, seal, and snip off a bottom corner to make a piping bag. Pipe about a tablespoon of filling onto each upturned half; top with another cookie, flat side down, and press down slightly so that the filling spreads to the edges of the cookie. Repeat until all the cookies are used. Refrigerate for at least 30 minutes before serving. The whoopie pies will keep for up to 3 days in the refrigerator.

    Makes about 30 whoopie pies.

    Adapted from Baked: New Frontiers in Baking.
    December 7, 2008
    Recipes
  • Cranberry Coffee Cake

    A few weeks ago one of my co-workers brought this lovely coffee cake to work, and as soon as I tasted it, I begged for the recipe. She was kind enough to make a copy of it for me…it’s handwritten on a recipe card, which makes me love it even more!

    I’m going to make this again soon, since I have a leftover can of cranberry sauce from Thanksgiving, and really, what else am I going to do with that? I made this for a brunch a while back, and I used a generic brand of cranberry sauce…a mistake, I think. The cranberry portion of the coffee cake tasted too sweet to me. This time I have good old Ocean Spray cranberry sauce, so I’m hoping it will taste as wonderful as when my co-worker made it. I’ll have to report back on that. 🙂

    Cranberry Coffee Cake

    • 1 stick butter
    • 1 cup sugar
    • 2 eggs
    • 1 cup sour cream
    • 1 teaspoon almond extract
    • 2 cups flour
    • 1 teaspoon baking powder
    • 1 teaspoon baking soda
    • 3/4 cup chopped pecans
    • 1 can whole cranberry sauce

    Glaze:

    • 3/4 cup powdered sugar
    • 2 to 3 tablespoons water
    • 1/2 teaspoon almond extract

    Preheat oven to 350 degrees F. Spray a bundt pan with cooking spray.

    Cream butter and sugar until fluffy. Add eggs, sour cream and almond extract and cream together. Add dry ingredients and mix well. Stir in pecans.

    Pour half the batter into the bundt pan; top with half of the cranberry sauce. Pour the remaining batter in the bundt pan, then the rest of the cranberry sauce.

    Bake for 55 minutes or until a toothpick comes out clean.

    Makes 12 servings.

    Source: my lovely co-worker, April.

    December 4, 2008
    Recipes
  • Cheese and Chive Scones

    I love scones, and I always forget how easy they are to make.

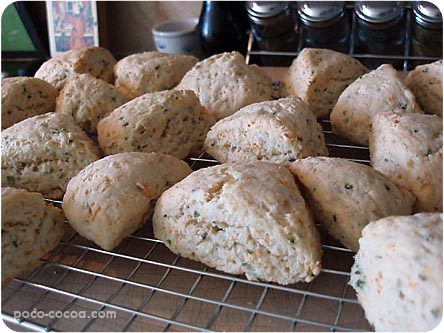
    I took these scones to a brunch a few days back, and everyone seemed to like them. I loved the fresh bite from the chives, and though the scones were great as-is, I’m sure they’d be even better with a smear of butter.

    I just remembered that when I was in college, I met a guy in my sociology class who was planning to go to culinary school after he got his nutrition degree, so of course we chatted quite a bit. One day for some odd reason, we decided to bake together…so we camped out at his apartment to bake scones. I remember feeling a little nervous, because he didn’t use a recipe; he just sort of tossed things together based on what he knew about biscuits. And they turned out well! You know, that guy went on to attend Le Cordon Bleu in Sydney, Australia. Too cool.

    Also, thinking of scones made me remember how wonderful fresh lemon curd is (though it would go best with sweet scones). I first made it when I was an intern at the Lake Austin Spa Resort, and I was so nervous that I’d mess it up, but it worked beautifully. It’s so intensely lemony, so sweet and real. I think we made a triple lemon dessert with it that night, layering it with lemon mouse and maybe some kind of lemon cake.

    Anyway, on to the savory scones.

    Cheese and Chive Scones

    • 3 cups all-purpose flour
    • 1 tablespoon baking powder
    • 1 tablespoon sugar
    • 2 teaspoons salt
    • 1/2 cup finely chopped fresh chives
    • 5 oz cheese (I used colby-jack), coarsely grated (1 1/2 cups)
    • 2 cups heavy cream

    Preheat oven to 400°F.

    Whisk together flour, baking powder, sugar, and salt. Add chives and cheese, tossing to combine. Stir in cream with a fork until a sticky dough forms.

    Turn dough out onto a lightly floured surface and knead 8 times with floured hands. Halve dough and form each half into a 7-inch round. Cut each into 8 wedges.

    Arrange wedges about 1/2 inch apart on an ungreased large baking sheet and bake in middle of oven until golden brown, about 20 minutes. Cool on a rack.

    Makes 16 scones.

    Source: epicurious.com

    December 3, 2008
    Recipes
←Previous Page
1 … 173 174 175 176 177 … 270
Next Page→

© poco-coca